
This guide will focus on how to install Virtualbox on Windows. Things to note are system requirements, step-by-step installation process and post-installation configuration for the time.
Introduction to VirtualBox
VirtualBox is a powerful virtualization software developed by Oracle, designed to enable users to create and manage virtual machines (VMs) on their computers. Virtualization is the technology that allows a single physical machine to host multiple operating systems. Developers achieved this by creating isolated environments known as virtual machines. This capability enables users to run different operating systems, such as Linux, Windows, and macOS, on a single hardware platform without needing to partition their hard drives or operate multiple physical devices.
One of the key advantages of VirtualBox is its compatibility with various host operating systems, including Windows, macOS, Linux, and Solaris. This broad support allows users from diverse technical backgrounds to leverage virtualization, thereby increasing efficiency and flexibility. Additionally, the software offers an intuitive interface that makes it accessible to both beginners and experienced users alike. With VirtualBox, setting up a virtual machine requires only a few simple steps. This allowing users to quickly experiment with different environments, test software, and run legacy applications.
Typical use cases for VirtualBox include software testing and development, where developers can create an isolated environment for testing new applications without interfering with their primary system. System administrators often use VirtualBox for training purposes, enabling them to simulate various scenarios in a controlled setting. VirtualBox facilitates learning and experimentation with different operating systems for individuals who may not have access to multiple physical devices. Overall, VirtualBox presents a compelling solution for anyone looking to maximize their computing resources through effective virtualization.
Install Virtualbox on Windows: System Requirements
Before embarking on the installation of VirtualBox on a Windows operating system, it is crucial to ensure that your system meets the necessary hardware and software requirements. The performance and usability of VirtualBox are contingent on these specifications, allowing users to create and manage virtual machines effectively.
For hardware, the minimum requirements for running VirtualBox include a processor with hardware virtualization support, such as Intel VT-x or AMD-V, which must be enabled in the BIOS or UEFI settings. You are advise to use a minimum of 4 GB of RAM, but for better performance especially when running multiple virtual machine, we recommend at least 8 GB or more. Disk space is another vital consideration; you need at least 10 GB of available hard disk space, with additional space required depending on the virtual machines’ disk images and data. Generally, allocating at least 20 GB is advisable to accommodate several virtual machines comfortably.
On the software front, VirtualBox is compatible with various versions of Windows, including Windows 7, 8, 8.1, and 10, alongside their respective 32-bit and 64-bit editions. Ensuring that your Windows version is up to date will provide better compatibility and performance. Additionally, note that virtualization features must be enabled within the BIOS/UEFI settings to maximize the capabilities of VirtualBox. Failure to enable these features may hinder the performance of virtual machines and could lead to issues during installation or operation.
Understanding and meeting these system requirements will facilitate a smoother installation process of VirtualBox, ensuring that users can create and manage their virtual environments with efficiency and reliability.
Install Virtualbox on Windows: Step-by-Step Installation Process
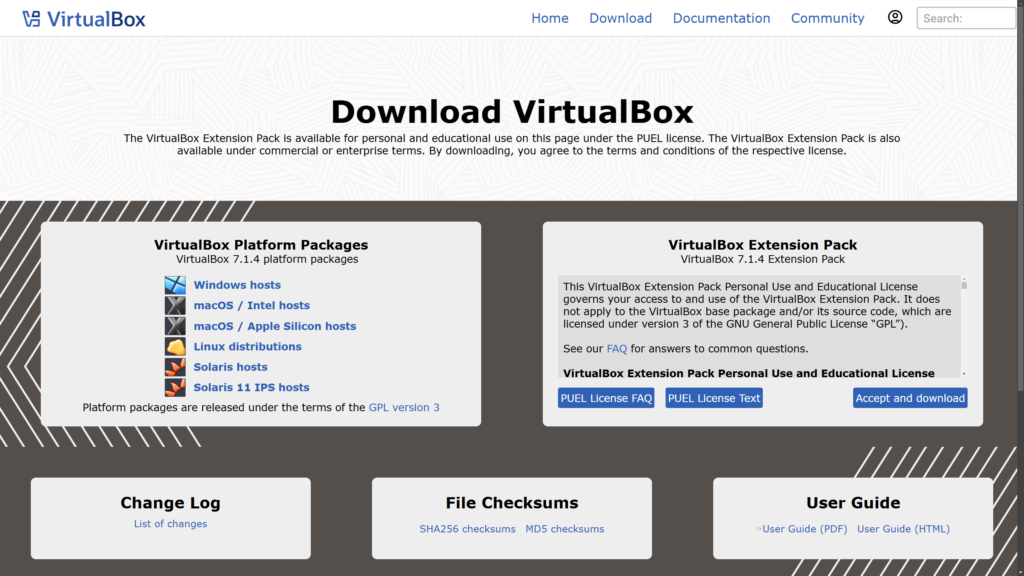
To install Virtualbox on Windows machine, the first step is to navigate to the official VirtualBox website. You can easily find it by searching for “VirtualBox” in your preferred search engine or directly entering the URL: https://www.virtualbox.org. Once on the website, locate the “Downloads” section, usually found on the homepage. Here, you will see a variety of options for different operating systems. Select the version for Windows.
It is essential to choose the correct version based on your system architecture. Most modern Windows machines run on either a 64-bit or 32-bit architecture. If you are uncertain which version to download, you can check your system specifications by right-clicking on “This PC” or “My Computer,” selecting “Properties,” and then looking under the System type section. Ensure that you select the appropriate installer accordingly.
After you download the installer, locate the file in your computer’s Downloads folder. Double-click the installer to begin the installation process. During the installation wizard, you will be prompted to agree to the license terms. It is advisable to read these terms carefully. Next, you will be able to customize the installation settings. Users can choose the default options or modify them based on personal preferences. This may include selecting the installation location and specific features to install.
Once these settings are configured, click “Install” to proceed with the installation. Be aware that you may need administrative privileges to complete this step. Follow the on-screen instructions, and in case of any issues, refer to the VirtualBox documentation or support forums for troubleshooting tips. After finishing the installation, restart your computer if prompted. You are now ready to begin using VirtualBox for your virtualization needs.
Install Virtualbox on Windows: Post-Installation Configuration and First Use
Once VirtualBox is successfully installed on your Windows system, the next step is to configure it for your first use. This process involves creating a new virtual machine (VM), which will allow you to run a different operating system within your Windows environment.
Creating VM Operating System
To begin, open VirtualBox and click on the “New” button in the toolbar. A wizard will appear, prompting you to enter a name for your VM and select the operating system you plan to install, whether it’s Windows, Linux, or another OS. Choosing the correct OS version is crucial, as it will help VirtualBox optimize the VM’s configuration.
Allocating VM Resource
After deciding on the operating system, you will need to allocate resources, such as RAM and CPU. It’s advisable to assign enough RAM to ensure the VM runs smoothly; generally, 2GB is a good start for basic tasks, but this may vary depending on your OS and the tasks you plan to perform. Additionally, allocate CPU cores by accessing the “System” settings within the VM configuration dialog. More cores can improve performance, especially for resource-intensive applications.
Next, configuring virtual hard drives is essential. You will have the option to create a new virtual hard disk or use an existing one. Opting for a dynamically allocated disk can save space on your host system, as it grows only as data is added. Setting an appropriate maximum size for the disk is also crucial, as it dictates how much space the VM can utilize.
Install Virtualbox Guest Additions
After setting up the VM, for enhanced performance and seamless integration, it is recommended to install the VirtualBox Guest Additions. This software package significantly improves usability by allowing features such as shared folders and clipboard sharing.
For additional information on advanced configurations and troubleshooting, consider reviewing the official VirtualBox documentation or community forums. This foundational setup will facilitate an efficient and productive virtual computing experience.
Hopefully this guide helps you to install Virtualbox on Windows operating system without sweat.
Leave a Reply